Getting Started
There are a number of ways to create an invoice in Syncro.
From the main invoice page, you can choose 'new invoice' like so:

You can quickly create a new invoice from the 'plus' menu here:

You can create an invoice for a specific customer from their customer detail page here:

You can also create an invoice for a customer directly from a ticket or an estimate. The invoice will not only link to the specific ticket or estimate, but any line item charges will carry over to the invoice as well.
Creating an invoice from a ticket:

Invoice Details:

Invoice number and status
At the top-left of an invoice, the invoice number and invoice status are indicated. Invoice statuses will indicate whether an invoice is paid or unpaid.
Invoice Edit
At the top-right of an invoice, you will have an 'edit' option that will allow you to manage:
- The creation date
- The invoice number
- Whether or not the invoice is taxable
- The date the invoice was paid
- The related ticket
- Tech Notes
- Payment information
Invoice Actions
The invoice actions option at the top-right of an invoice provides various ways to further manage your invoice, specifically:
- Refund - to begin a partial or full refund of the invoice.
- Email - to send an option custom invoice message to the customer's email and / or invoice or payment receipt PDFs.
- Snail Mail - to mail a physical copy of an invoice if you have purchased "stamp" credits for your account.
- Add Attachment
- Make Recurring - for creating a recurring schedule for this particular customer's invoice, allowing you to determine the recurring invoice's template name and frequency, among other options.
- Clone - to create a duplicate instance of this invoice which can be associated with a new customer or the original customer.
PDF option
For previewing, printing or downloading the PDF version of your invoice.

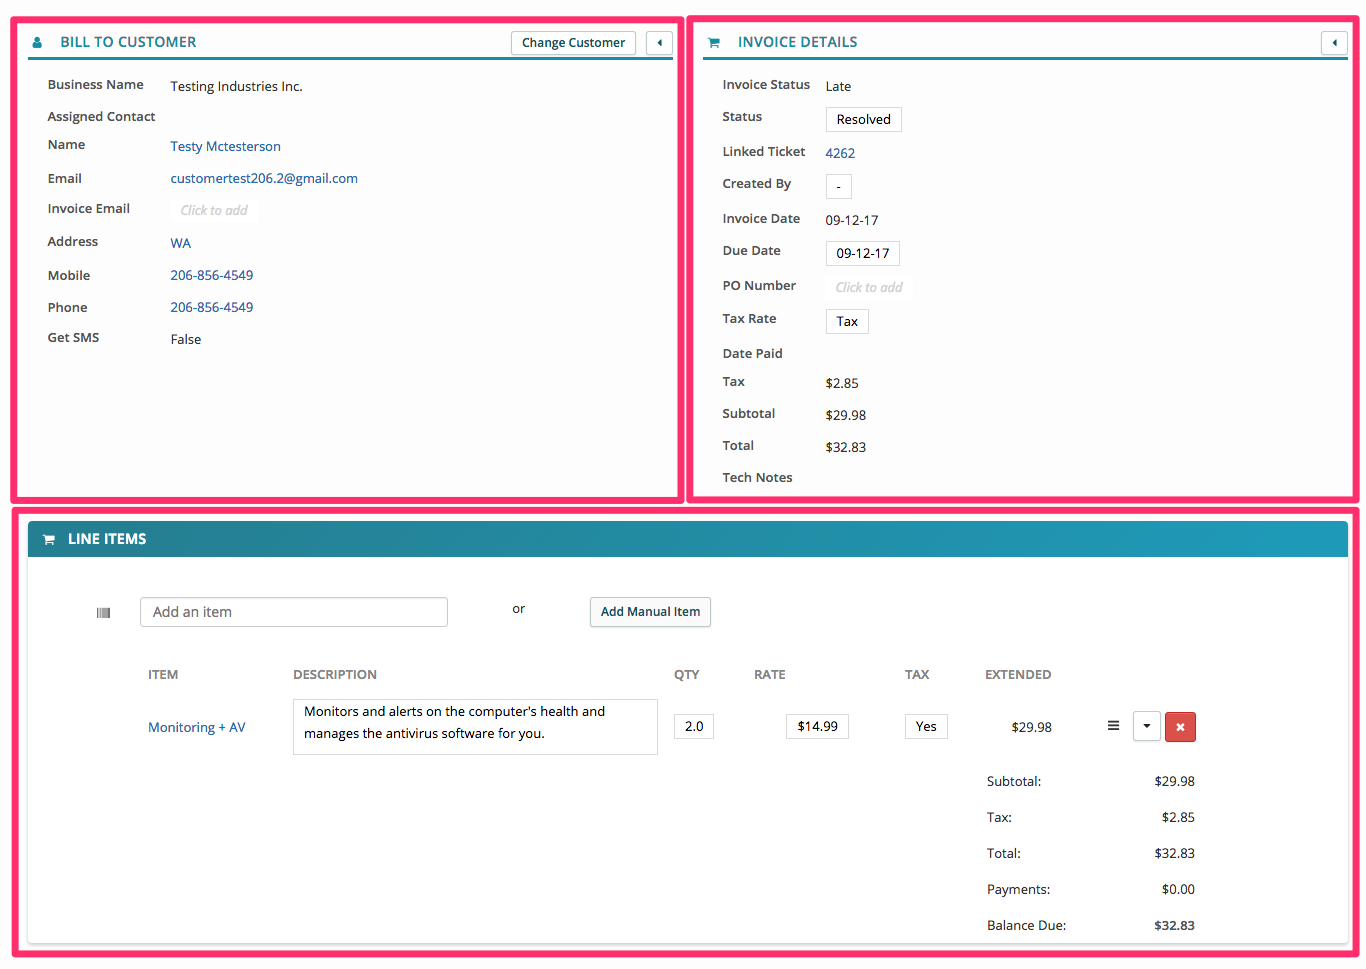
Bill To Customer
This section includes all of the contact information for the customer the invoice is associated with. Choosing 'Change Customer' in the upper-right of this section allows you to associate the invoice with a different customer. The 'arrow' button allows you to minimize or expand this field.
Invoice Details
This section provides various details about the invoice, many of which can be modified in the invoice 'Edit' options detailed above. The "Tax Rate" option in this section allows you to choose which tax rate to apply to this invoice if you have more than one configured. The 'arrow' button in the upper-right of this section allows you to minimize or expand this field.
Line Items
In the 'Line Items' section you can add item charges to the invoice by scanning a barcode in the "Add an Item" field or manually searching for the item in this field. Typing the first few letters of the inventory item will begin to populate results from your inventory that you can quickly choose from.
Alternatively, you can choose the "Add Manual Item" option to create a new item directly from the invoice. The "Add Manual Item" includes the following fields:
 Editing Line Items
There are various ways to edit a line item from an invoice.
Clicking the 'DESCRIPTION', 'QTY', 'RATE' or 'TAX' fields will allow you to make edits directly to those fields. Changes made to the line item will only effect the item in the invoice, not in your actual inventory.
In addition to the edit options above, the three icons to the right of each line item provides some additional functionality:

The hamburger button will allow you to re-arrange the order of the line items of an invoice.
The down-arrow button will expand further edits that can be made to the line item, including adjusting the item cost and applying manual discounts.
The red 'X' button deletes the line-item on the invoice.

Applied Payments
The 'applied payments' field will indicate all payments that have been applied to the invoice. Clicking the date-field hyperlink will direct you to the corresponding payment page. The PDF icon will pull up a PDF of the payment receipt, allowing you to print the receipt or download to your local computer.
Emails
The 'Emails' field will list a record of all emails sent to the customer from the invoice page.
Attachments
This field allows you to attach any relevant documents, links or images to the invoice.
Terms and Conditions & Signature
These fields allow you to display your terms and conditions for the customer to accept and sign for.
Your invoice terms and conditions can be modified at Admin > PDF / Email Templates > Invoice Template > Invoice Disclaimer.
Change History
This field is only visible for global admins. It will list modifications made to the invoice since its creation. When applicable, the email address of the user that made the modification will be displayed.
Invoice Quickview
The Invoice Quickview allows you to click on the magnifying glass icon next to the listed Invoice to view a quick pop-up modal that displays some handy information and links:

You can use the Quickview to see all of the line items on the Invoice as well as the Invoice totals and payments.
The status of the Invoice will be displayed at the top, and below that are a few action buttons that allow you to perform some basic actions on the Invoice including performing a refund or viewing the Invoice PDF.
The magnifying glass icon will appear next to the Invoice in many areas of the system so you can get an overview of the contents of the Invoice without having to navigate to the page itself.